
Let’s be real for a second. Sunday night meal prep usually feels less like self-care and more like a chore you’re trying to outrun. I used to spend hours chopping, roasting, and sweating over three different pots just to have five sad containers of food that tasted dry by Wednesday. Honestly, it was exhausting. But then I stumbled onto this concept of “one base, five different lunches,” and everything changed. The secret isn’t in making five separate dinners; it’s in mastering one incredible flavor profile that carries you through the workweek. That flavor profile is this sticky, savory, slightly sweet chicken sauce that clings to every bite.
I first made these Easy Sticky Chicken Bowls when I was trying to cut down on takeout spending but still wanted that addictive restaurant-quality taste. You know that feeling when you order spicy honey chicken or teriyaki beef and it’s just so good? I wanted that, but healthy, portion-controlled, and ready to grab from the fridge at 12:30 PM. After testing this sauce over a dozen times, I realized the magic is in the balance of soy, ginger, garlic, and a touch of sweetness. It’s not just a recipe; it’s a system. And once you get the hang of it, you’ll never look at your Tupperware drawer the same way again.
This recipe is perfect for busy professionals, parents who need to feed picky eaters, or anyone who just hates the idea of cooking after a long day. The chicken stays juicy, the veggies retain their crunch, and that sticky sauce? It gets better as it sits. I’ve found that the flavors meld overnight, making Tuesday’s lunch taste even better than Monday’s. If you’re tired of boring salads and stale sandwiches, this is your answer. It’s reliable, delicious, and frankly, a lifesaver for your wallet and your sanity.
Why You’ll Love This Recipe
After years of testing meal prep recipes that turned into mush or bland disappointments by day three, I’m confident in saying this is the gold standard. This isn’t just another chicken breast recipe; it’s a carefully balanced system designed for longevity and flavor. Here is why this specific version of sticky chicken bowls wins every single time:
- Quick & Easy Prep: The chicken cooks in under 15 minutes, and the sauce comes together in the same pan. You’re looking at a total active time of about 30 minutes, which is perfect for those nights when you’re tired but still want to eat well.
- Simple Ingredients: You likely have everything in your pantry right now. Soy sauce, rice vinegar, honey, garlic, and ginger. No fancy trips to specialty stores needed. It’s wholesome, recognizable food that tastes complex.
- Perfect for Meal Prep: These bowls are engineered for the fridge. Unlike lettuce-based salads that wilt, these sturdy ingredients hold up beautifully for up to five days. The chicken doesn’t dry out because it’s coated in that protective, flavorful glaze.
- Crowd-Pleaser: Even my husband, who claims he only likes “plain” food, asks for seconds of these. The sticky sauce hits all the right notes—savory, sweet, and a little kick of heat if you want it.
- Unbelievably Delicious: The texture contrast between the tender chicken, crunchy vegetables, and chewy rice is next-level. It’s comfort food that actually fuels you without leaving you feeling sluggish.
What makes this recipe different from the rest is the technique. Most people boil or bake the chicken separately, then toss it. I’ve found that searing the chicken in the same pan where you reduce the sauce creates a fond—those browned bits at the bottom—that infuses the sauce with incredible depth. It’s a chef’s trick that’s actually very easy to do at home. Plus, the sauce is designed to coat, not drown. You get that glossy, sticky finish without the mess. It’s the kind of recipe that makes you close your eyes after the first bite, nodding in approval. It’s practical, but it feels like a treat. It turns a simple lunch into something memorable, saving you from the 2 PM slump and the temptation to order UberEats.
What Ingredients You Will Need
This recipe relies on a handful of high-impact ingredients that work together to create that signature sticky texture and savory-sweet flavor. You don’t need anything exotic, just quality basics. Here is exactly what you need to build your base:
- Chicken Breast or Thighs: I prefer boneless, skinless chicken thighs for meal prep because they stay juicier than breasts when reheated. If you use breasts, make sure not to overcook them. Look for fresh, pink meat with no gray spots. About 1.5 lbs total.
- Low-Sodium Soy Sauce: This is your salty, umami base. I recommend using a brand like Kikkoman or a gluten-free tamari if you’re avoiding wheat. It provides the deep savory color and taste. You’ll need about 1/3 cup.
- Rice Vinegar: This adds the necessary acidity to cut through the sweetness and richness of the sauce. Do not use distilled white vinegar; it’s too harsh. Look for a bottle labeled “Rice Vinegar” with no salt added. 2 tablespoons.
- Honey or Maple Syrup: For that sticky, glaze-like consistency, you need a sweetener. Honey gives it that classic Asian takeout shine, but pure maple syrup works great for a vegan option. 3 tablespoons.
- Garlic and Ginger: Fresh is non-negotiable here. Pre-minced garlic in a jar just doesn’t have the same punch. Grate your ginger fresh for a bright, spicy kick. 3 cloves of garlic and 1 tablespoon of fresh ginger.
- Cornstarch: This is the secret weapon. It coats the chicken to help it crisp up slightly and thickens the sauce into a glossy glaze. 1 tablespoon for the chicken, 1 tablespoon mixed with water for the sauce.
- Sesame Oil: Just a teaspoon at the end adds that nutty aroma that signals “Asian-inspired” to your brain. It’s potent, so don’t overdo it.
- Red Pepper Flakes: Optional, but highly recommended if you like a little heat. It balances the sweetness perfectly. 1/2 teaspoon, or to taste.
- Vegetables: I use a mix of broccoli florets and snap peas. They hold up well in the fridge and add great crunch. 2 cups total.
- Base Grain: Jasmine rice or brown rice works best. Jasmine is fluffy and fragrant, while brown rice adds fiber and chew. Cook about 1.5 cups of uncooked rice for your batch.
For the best results, I always buy fresh ginger root and grate it myself. The essential oils in fresh ginger are so much stronger than the dried powder. Also, when buying chicken, try to find pieces that are similar in size so they cook evenly. If your pieces are wildly different, you might end up with some dry bits and some undercooked ones. Consistency is key in meal prep.
Do I Need Special Equipment?
You don’t need a fancy kitchen to make these bowls. A large non-stick skillet or a wok is essential for getting that nice sear on the chicken and reducing the sauce quickly. If you don’t have a wok, a large frying pan works just fine. You’ll also need a few glass meal prep containers with tight-fitting lids. I swear by glass because they don’t stain from the soy sauce and can go from fridge to microwave without melting. A simple whisk is all you need to emulsify the sauce ingredients before pouring them into the pan. No food processor or blender required. Keep it simple, keep it clean.
Preparation Method

Getting these bowls ready for the week is straightforward if you follow this sequence. The goal is to cook everything efficiently so you have hot food ready to pack while it’s still fresh. Here is how to do it step-by-step:
- Prep the Chicken (5 minutes): Pat your chicken pieces dry with paper towels. Moisture is the enemy of a good sear. Cut them into bite-sized cubes, about 1-inch pieces. In a bowl, toss the chicken with 1 tablespoon of cornstarch, 1/2 teaspoon of salt, and 1/4 teaspoon of black pepper. The cornstarch will create a light crust that helps the sauce stick later. Make sure every piece is lightly coated.
- Cook the Chicken (8-10 minutes): Heat a large skillet over medium-high heat with a drizzle of oil. Once the oil is shimmering, add the chicken in a single layer. Don’t crowd the pan; do this in two batches if your pan is small. Let the chicken cook undisturbed for 3-4 minutes until golden brown on one side. Flip and cook for another 3-4 minutes until cooked through. Remove the chicken from the pan and set it aside on a plate. Do not clean the pan yet; those browned bits are flavor gold.
- Make the Sauce (2 minutes): In a small bowl, whisk together the soy sauce, rice vinegar, honey, minced garlic, grated ginger, and red pepper flakes. Whisk until the honey is fully dissolved. Set this aside while you cook the veggies.
- Steam the Vegetables (5 minutes): In the same pan (now empty but still hot), add a splash of water and the broccoli and snap peas. Cover with a lid for 2 minutes to steam them slightly. This keeps them bright green and crisp-tender. If you prefer softer veggies, steam for an extra minute. Remove veggies and set aside with the chicken.
- Reduce the Sauce (3 minutes): Lower the heat to medium. Pour your whisked sauce into the hot pan. It will bubble vigorously. Let it simmer for about 2 minutes. Then, mix 1 teaspoon of cornstarch with 1 tablespoon of cold water to make a slurry. Pour this into the bubbling sauce while stirring constantly. The sauce will thicken rapidly into a glossy glaze. This should take about 60 seconds. Watch it closely; it goes from perfect to burnt quickly.
- Combine Everything (2 minutes): Return the chicken and vegetables to the pan. Pour the thickened sauce over everything. Toss gently until every piece of chicken and veggie is coated in that sticky glaze. Remove from heat and stir in the sesame oil. Taste and adjust seasoning if needed—add more honey if it’s too salty, or more soy if it’s too sweet.
- Cool and Pack (10 minutes): Let the mixture cool for about 10 minutes before packing. This prevents condensation in your containers, which can make your rice soggy. Divide the rice into your containers first, then top with the chicken and veggie mixture. Seal tightly.
One tip I learned the hard way: don’t pack the rice while it’s piping hot. The steam will get trapped and turn your rice into a mushy brick. Let it cool to room temp, or at least warm, before sealing. It makes a huge difference in texture.
Cooking Tips & Techniques
There are a few little tricks that separate a good batch of chicken from a great one. First, always dry your chicken. If it’s wet, it steams instead of sears. I use paper towels to blot them until they feel almost dry to the touch. Second, when reducing the sauce, keep the heat at medium. High heat can burn the honey and garlic, leaving a bitter aftertaste. You want that sweet, savory balance, not charred bits. Also, don’t skip the cornstarch slurry. Without it, you’ll have a thin, watery sauce that pools at the bottom of your container. The slurry gives it that clingy, restaurant-quality texture that makes you want to lick the bowl.
I once tried using brown sugar instead of honey, and while it worked, the sauce became grainy and didn’t glaze as nicely. Honey is the superior choice for this specific recipe. Another common mistake is overcooking the veggies. Broccoli should still have a slight bite to it because it will continue to soften in the microwave when you reheat your lunch. If it’s mushy when you pack it, it’ll be sad by Wednesday. Aim for crisp-tender. Finally, taste your sauce before combining. If your soy sauce is very salty, you might want to add a splash more water or vinegar to balance it out. Trust your palate.
Variations & Adaptations
One of the best things about this base recipe is how flexible it is. You can tweak it to fit your dietary needs or just what’s in your fridge. If you want to make this gluten-free, simply swap the soy sauce for tamari or coconut aminos. The flavor is nearly identical, and coconut aminos are slightly sweeter, so you might reduce the honey by a teaspoon. For a lower-carb option, skip the rice and use cauliflower rice. You’ll need about 4 cups of riced cauliflower, which you can sauté in the pan after removing the chicken. It absorbs the sauce beautifully.
Want more protein? Add some edamame or tofu cubes. Press firm tofu, cube it, and pan-fry it until crispy before adding it back to the sauce. It works surprisingly well. For a spicy kick, add a tablespoon of sriracha or chili garlic sauce to the sauce mixture. I love this version for days when I need a bit of energy. You can also swap the vegetables. Bell peppers, carrots, or zucchini all work well. Just keep in mind that softer veggies like zucchini might get a bit mushy by day five, so they’re best eaten in the first two days. Carrots and broccoli hold up the best. Feel free to mix and match based on what you have.
Serving & Storage Suggestions
These bowls are best served at room temperature or gently reheated. When you’re ready to eat, microwave the container for 2-3 minutes, stirring halfway through to ensure even heating. The sauce will re-thicken as it heats, so if it looks too thick, add a splash of water before microwaving. For presentation, I like to garnish with sliced green onions and a sprinkle of sesame seeds right before eating. It adds a fresh pop of color and crunch that makes the meal feel special. Pair these with a side of miso soup or a simple cucumber salad for a complete lunch.
For storage, keep the bowls in the refrigerator for up to 5 days. They actually taste best on day 3 and 4 as the flavors have fully melded. If you want to freeze them, note that the rice texture changes slightly upon thawing, becoming a bit softer. It’s still edible, but not ideal if you prefer fluffy rice. If freezing, consider using quinoa or buckwheat instead, as they hold up better. Always label your containers with the date so you know when to eat them. And please, don’t leave them out at room temperature for more than 2 hours. Food safety is key, even when the food tastes amazing.
Nutritional Information & Benefits
While exact numbers depend on the specific brands and portions you use, these bowls are a balanced meal. Chicken breast provides high-quality protein, which helps keep you full and supports muscle repair. The vegetables add fiber, vitamins A and C, and antioxidants. The rice offers carbohydrates for energy, which is crucial for a midday slump. The sauce contains some sodium, so using low-sodium soy sauce is a smart move. Overall, this recipe is relatively low in saturated fat and high in protein. It’s a great option for anyone looking to maintain a healthy weight or build muscle without spending hours in the kitchen. It’s nourishing, satisfying, and straightforward. No hidden sugars or weird additives, just real food that works for your body.
Conclusion
There is something deeply satisfying about opening your fridge on a random Wednesday and finding five perfectly packed, delicious meals waiting for you. These Easy Sticky Chicken Bowls are more than just lunch; they are a tool for reclaiming your time and enjoying better food. I’ve made this recipe so many times that I can do it in my sleep, and I know you will too. It’s reliable, tasty, and incredibly versatile. I encourage you to try it your way. Maybe you add extra ginger, or swap the rice for quinoa. Make it your own. The beauty of meal prep is that it adapts to you, not the other way around.
If you try this recipe, I’d love to hear how it turned out. Did you add extra veggies? Did your kids devour it? Leave a comment below and let me know your favorite variation. Sharing these moments helps me keep creating content that actually helps you. And if you have friends who are struggling with meal prep, share this with them. Let’s help each other eat better, one bowl at a time. Here’s to stress-free lunches and delicious dinners. You’ve got this!
Frequently Asked Questions
Can I use frozen chicken for this recipe?
It’s best to use fresh chicken for the best texture. If you must use frozen, thaw it completely in the fridge overnight before prepping. Cooking frozen chicken directly can lead to uneven cooking and a soggy texture, which isn’t ideal for meal prep.
How do I prevent the rice from getting soggy?
The key is to let the rice cool completely before packing it. Hot rice releases steam, which gets trapped in the container and turns the rice mushy. You can also spread the cooked rice on a baking sheet to cool it down faster.
Can I make this recipe spicy?
Absolutely. Start with 1/2 teaspoon of red pepper flakes and add more to taste. You can also stir in a tablespoon of sriracha or chili garlic sauce into the sauce mixture for a deeper, garlicky heat.
What can I substitute for honey?
Maple syrup is a great substitute, especially for a vegan version. Agave nectar also works well. Keep in mind that maple syrup has a distinct flavor, so the taste will be slightly different but still delicious.
How long do these bowls last in the fridge?
They last up to 5 days when stored in airtight glass containers. However, I usually find they are best eaten within the first 3 days for optimal texture and flavor.
Pin This Recipe!

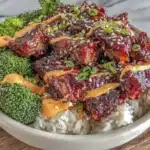
Easy Sticky Chicken Bowls: 1 Base, 5 Lunches
- Total Time: 30 minutes
- Yield: 5 servings 1x
Description
A meal prep system featuring a sticky, savory-sweet chicken sauce that stays juicy and flavorful for up to five days, perfect for busy professionals and parents.
Ingredients
- 1.5 lbs boneless, skinless chicken thighs or breasts, cut into 1-inch cubes
- 1 tablespoon cornstarch (for coating chicken)
- 1/2 teaspoon salt
- 1/4 teaspoon black pepper
- 1/3 cup low-sodium soy sauce
- 2 tablespoons rice vinegar
- 3 tablespoons honey or maple syrup
- 3 cloves garlic, minced
- 1 tablespoon fresh ginger, grated
- 1 teaspoon sesame oil
- 1/2 teaspoon red pepper flakes (optional)
- 2 cups broccoli florets and snap peas
- 1.5 cups uncooked jasmine or brown rice
- 1 tablespoon cornstarch mixed with 1 tablespoon cold water (for sauce slurry)
- Cooking oil for skillet
Instructions
- Pat chicken pieces dry and toss with 1 tablespoon cornstarch, salt, and pepper until lightly coated.
- Heat a large skillet over medium-high heat with oil. Sear chicken in a single layer for 3-4 minutes per side until golden and cooked through. Remove chicken and set aside.
- In a small bowl, whisk together soy sauce, rice vinegar, honey, garlic, ginger, and red pepper flakes.
- In the same pan, add a splash of water and vegetables. Cover and steam for 2 minutes until crisp-tender. Remove and set aside with chicken.
- Pour the whisked sauce into the hot pan and simmer for 2 minutes. Stir in the cornstarch slurry and cook for 60 seconds until the sauce thickens into a glossy glaze.
- Return chicken and vegetables to the pan. Toss to coat evenly in the sauce. Remove from heat and stir in sesame oil.
- Let the mixture cool for 10 minutes. Pack cooked rice into containers, then top with the chicken and vegetable mixture. Seal tightly.
Notes
Do not pack rice while it is piping hot to prevent sogginess. Ensure chicken is dry before searing for best texture. The sauce thickens as it cools; add a splash of water when reheating if needed. Best eaten within 3 days for optimal texture.
- Prep Time: 15 minutes
- Cook Time: 15 minutes
- Category: Main Course
- Cuisine: Asian
Nutrition
- Serving Size: 1 bowl per serving
- Calories: 450
- Sugar: 18
- Sodium: 600
- Fat: 12
- Saturated Fat: 2
- Carbohydrates: 45
- Fiber: 4
- Protein: 35
Keywords: meal prep, sticky chicken, chicken bowls, healthy lunch, easy dinner, one pan meal, high protein, gluten-free option


